React Native may be close to a decade old, but it still holds as one of the most popular and reliable development frameworks. Developers love it because they only have to write code once, and it's (almost) ready for deployment across iOS and Android platforms.
Many beginners, especially those already familiar with JavaScript’s React library, start with this technology. However, when starting from scratch, every tip and guide is invaluable.
If you’re looking to learn how to create a React Native app, you’re in the best place. Prepare to discover the process of building and developing Android and iOS apps using React Native from A-Z.
What is React Native and Why Use It?
React Native is a cutting-edge mobile app development framework that uses JavaScript and React.js principles to build and deploy applications across multiple platforms. Since this technology allows using the same code for iOS and Android, it has a streamlined development process that takes less time and requires less effort than more complex frameworks.
These efficient cross-platform capabilities translate into high-performance applications with near-native performance, making React Native an excellent choice for devs. Moreover, it enables a smooth transition into mobile development for those familiar with web technologies.
Beginners also favor React Native due to its intuitive environment and extensive community support. Such characteristics mean a leaner learning curve and troubleshooting.
Can React Native be Used for Web Apps?
React Native for Web is an extension that allows developers to use React Native components and APIs to build web applications. This framework leverages the benefits of React.js and React DOM to render React Native-compatible components within web browsers.
Thanks to this integration, developers can use features like a JavaScript-based styling API, built-in layout adjustments, and a well-rounded gesture system. However, React.js is the key here because it provides the foundation for building user interfaces with reusable components, while React DOM handles the rendering of these components in the web environment.
With this compatibility layer, devs can write a single codebase in React Native that can potentially run on Android, iOS, and the web. Keep in mind that not all React Native components translate equally well to web browsers due to dependencies on mobile-specific APIs.
While React Native for Web offers browser-compatible versions of many elements, some mobile-centric functionalities may not be fully replicable in web environments.
Despite these limitations, React Native for Web facilitates cross-platform development and enables substantial code sharing between mobile and web applications. This comes as a result of a community-driven effort to extend React Native’s capabilities beyond mobile platforms, turning it into a versatile tool for modern app development across different environments.
What are the Benefits of Reactive Native?
React Native was the second most used cross-platform framework in 2023, right behind Flutter. There’s a reason for that, with the following being the most important:
1. Helps Save Resources
Unlike other frameworks, React Native requires only one team to write the code and deploy the app on iOS and Android. Moreover, it eliminates the need for the developer to recompile after each change, as the app immediately reloads while in development.
Since time often equals money, you will cut costs by working with a single team. You also don’t have to work on every platform separately or struggle with hefty modifications after deploying the app. Instead, you will see changes without a full recompile due to hot reloading.
2. Community-driven
React Native’s source code is publicly available for anyone to view, modify, and contribute to. Although Facebook ensures regular updates and reliable support, developers from any part of the world can contribute to the project.
A collective effort can help you fix bugs, add new features, and boost performance, meaning you can develop a robust and resilient app at a lower cost. Open source also lets you see precisely how the code works, which is necessary for better debugging and optimization.
3. Quick and Easy Updates
An increasing number of people don’t update their phones and computer software. The situation is likely not much better with apps, as users often find notifications and going through the app store review process pesky and too much work.
React Native allows developers to push updates directly to users’ devices. Devs can instantly deploy bug fixes and new features, allowing users to always have the latest app version without doing anything.
4. Code Reusability
A component-based architecture makes it possible to create reusable UI components and business logic. This means you can use the same components across various parts of the app or even in different projects. React Native also promotes code reuse through third-party libraries and modules compatible with both iOS and Android platforms. Thanks to this, you’ll reduce effort duplication without sacrificing consistency and easy maintenance and updates.
How to Prepare Your App Development Environment?
If you’re wondering how to create a React Native app, begin with an adequate development environment.
Install Node.js and npm/yarn:
The first step to ensure you meet all prerequisites for a functional React Native app is to install Node.js, which includes npm or yarn. Node.js establishes the runtime environment for JavaScript on your machine, while npm or yarn manages packages and dependencies required for building React Native applications.
Install React Native CLI
The React Native Command Line Interface (CLI) is the key to creating and managing React Native projects. Install the CLI globally with npm or yarn to access commands that allow you to start new projects, run apps on simulators or devices, and handle project configurations.
Since the CLI tools are familiar and easy for those experienced with React.js, this integration with React Native is among the key reasons to choose React.js.
Set Up Android and iOS Development Environment
If you want to target both environments, install Android Studio and prepare Android SDKs and virtual devices, or install Xcode and necessary tools for iOS development on macOS. These are a must-have once you start testing and debugging React Native apps on both major mobile platforms.
Set Up an IDE
Prepare the grounds for a streamlined development process with an IDE like Visual Studio Code or JetBrains WebStorm. You’ll likely need the features these apps offer, such as syntax highlighting, code completion, and integrated terminal support.
However, consider customizing them with relevant extensions for React Native development to optimize your workflow.
How to Create React Native App Typescript?
Developers typically choose TypeScript in React Native for its clearer code readability and better documentation through type annotations, making it easier to maintain large-scale apps. This combination works even better with React.js, often included in the best web application development platforms due to its flexibility.
Moreover, TypeScript’s robust typing system simplifies collaboration between team members and ensures the code is consistent regardless of modules and files.
Here are the steps you should take to create a React Native app using TypeScript:
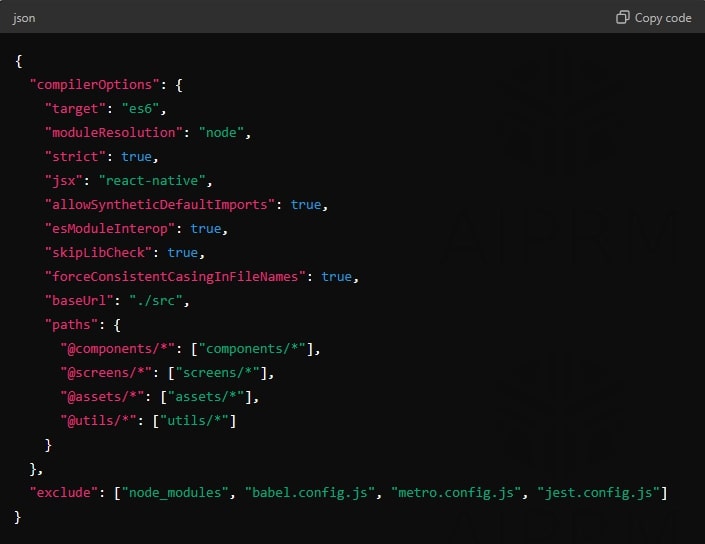
- Start a new project with the React Native CLI and specify TypeScript as the template. Use the command npx react-native init MyApp –template react-native-template-typescript to scaffold the project structure with TypeScript support. This setup automatically generates TypeScript configuration files (tsconfig.json) for React Native, which enables type-checking and modern JavaScript features.

- Fine-tune the tsconfig.json file to configure TypeScript in the project to suit your development needs. Adjust compiler options such as target platform (e.g., ES5 or ES6), module resolution paths, and strict mode settings for greater code quality and compatibility. TypeScript’s static typing will help you catch potential errors during development. As a result, you’ll reduce bugs and improve code robustness over traditional JavaScript.
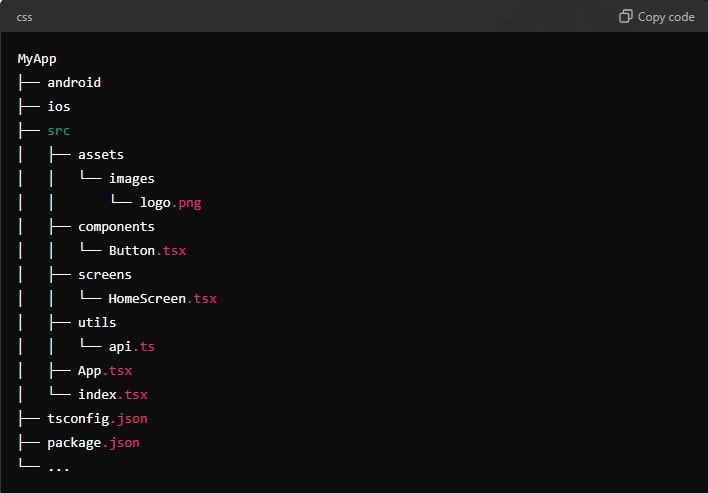
- Explain the structure of a TypeScript-based React Native project, which maintains a structure similar to a JavaScript project but with .tsx files for TypeScript components. Clarify directories for assets, components, screens, and utilities to accomplish organized and scalable code architecture. Moreover, TypeScript’s IntelliSense support in editors like Visual Studio Code can increase your team’s productivity with real-time code suggestions, type definitions, and error feedback directly within the development environment.
How to Build and Deploy a React Native App?
The process of building and deploying a React Native app includes multiple steps centered around the development, testing, and deployment phases.
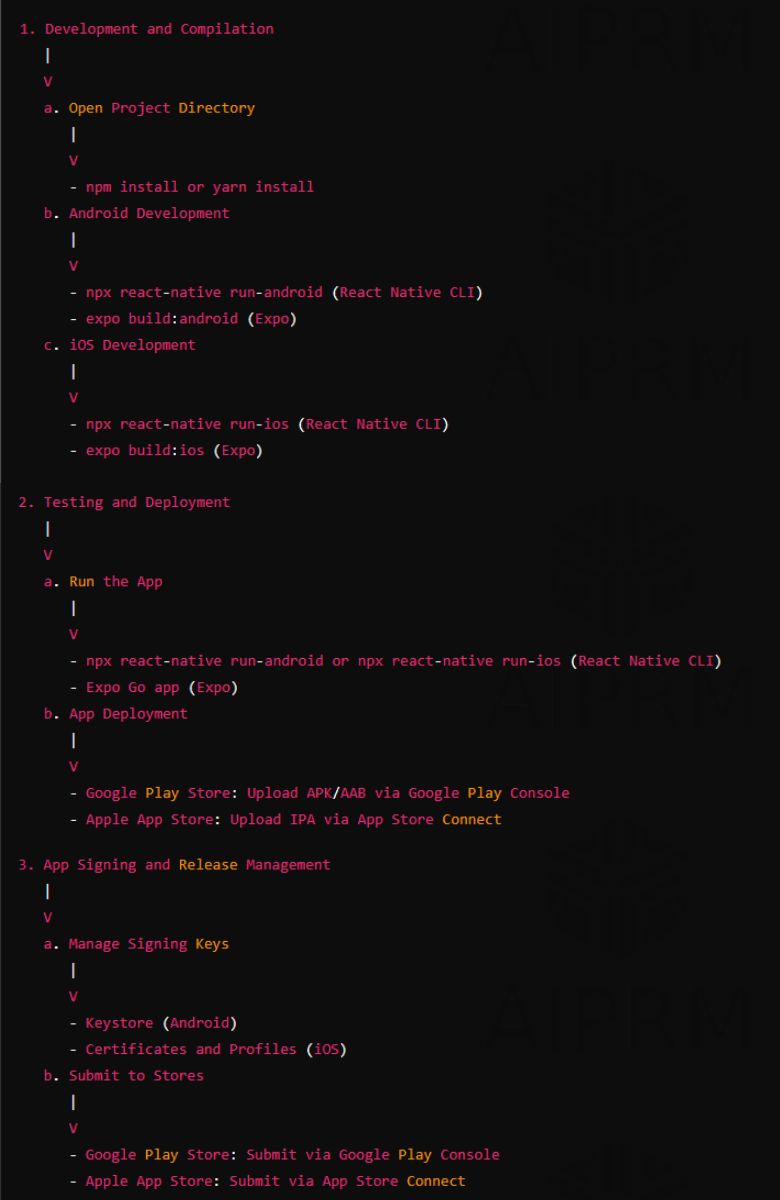
1. Development and Compilation
Initiate the Process:
- Open your project directory and make sure you installed all dependencies using npm install or yarn install.


- If you’re using TypeScript, ensure you have a tsconfig.json file and use TypeScript files (.tsx and .ts).
Android Development:
- If You’re Using React Native CLI: Run npx react-native run-android to build and start the app on an Android emulator or connected device.

- If You’re Using Expo: Use expo build:android to generate an APK or AAB file for Android. You’ll receive a prompt to provide a keystore or let Expo handle it. Back up the keystore if Expo generates it for you.

iOS Development:
- If You’re Using React Native CLI: Launch npx react-native run-ios to build and run the app on an iOS simulator. However, if you’re building a production version, you’ll need to use Xcode.

- If You’re Using Expo: Run expo build:ios to generate an IPA file for iOS. Expo will offer the option to handle it for you or ask you to provide credentials.

2. Testing and Deployment
Run the App:
- Test your app on simulators or physical devices. In case you’re working with React Native CLI, use npx react-native run-android or npx react-native run-ios. On the flip side, if you chose Expo, use the Expo Go app to run the app during development.

App Deployment:
- Google Play Store: Prepare your app listing with the necessary assets, such as app name, description, screenshots, and app category. Upload the signed APK/AAB file through the Google Play Console.
- Apple App Store: Check whether your app meets all guidelines, including the app icon and metadata. Use Xcode or Transporter to upload the IPA file to App Store Connect.
3. App Signing and Release Management
Manage Signing Keys:
- If you’re an Android user, manage your keystore file securely and use it for signing APK and AAB files.
- However, if you went down the iOS path, manage your distribution certificates and provisioning profiles through Xcode or Apple Developer Portal.
Submit to Stores:
- Google Play Store: Follow the steps in the Google Play Console to submit your app for review.
- Apple App Store: Use App Store Connect to submit your app for review. You should have a demo account for Apple in case you need to review it.
Top 3 Examples of React Native Apps
Developers often need a React Native app example to get ideas and start their projects. The following apps have all used React Native to provide the best experience for their customers.
1. Amazon Kindle
Most developers know that Facebook and many other apps within Meta’s ecosystem use React Native. However, not many are aware that the Kindle UI has switched from legacy JavaScript code to this framework. Amazon chose React Native because it simplifies the inclusion of new features and improves the customer experience (CX).
2. Shopify
Shopify announced in 2020 that it would migrate all of its native mobile apps to React Native because it considers it the future of mobile. Although most screens look and feel the same, their apps now have simpler code and more developers contributing to Shopify Mobile.
3. Discord
This app adopted React Native for Android and iOS as soon as it became open source. Despite facing a few challenges with iOS along the road, Discord managed to achieve native performance with React Native and praises the framework for ensuring zero crashes and high user satisfaction. Moreover, they accomplished all of it with a team of only three core iOS engineers.
Scalable, Efficient, and Community-driven; What is There Not to Like?
React Native has various advantageous features that make it the easy first choice for both new and experienced developers. As a versatile framework, it cuts the development time and effort while being ideal for building apps of any size and complexity.
Now that you know the basics of how to create a React Native app, it’s time to lay down the foundations of your project. If you require a backup or have a tight timeline, consider teaming up with professionals experienced in tailored web application development services. This strategy can help you develop a high-performing, native-like app fast and stress-free.